


76 results found
Case
Sympathetic nerves (Gray's illustrations)

Published
13 Oct 2022
35% complete
Diagram
Case
Autonomic ganglia of the head and neck (Gray's illustrations)

Published
13 Oct 2022
35% complete
Diagram
Case
Autonomic nervous system (Gray's illustration)

Published
12 Oct 2022
35% complete
Diagram
Case
Cervical plexus (Gray's illustrations)

Published
05 Jan 2022
32% complete
Diagram
Case
Brachial plexus (Gray's illustrations)

Published
05 Jan 2022
32% complete
Diagram
Case
Spinal nerve roots (Gray's illustrations)

Published
05 Jan 2022
32% complete
Diagram
Case
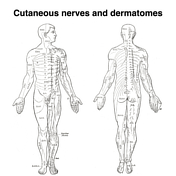
Dermatomes (Gray's illustrations)
Published
05 Jan 2022
35% complete
Diagram
Case
Cutaneous spinal nerves of the upper limb (Gray's illustrations)

Published
05 Jan 2022
29% complete
Diagram
Case
Cutaneous spinal nerves of the lower limb (Gray's illustrations)

Published
05 Jan 2022
29% complete
Diagram
Case
Internal features of the lateral ventricles (Gray's illustrations)

Published
27 Dec 2021
32% complete
Diagram
Case
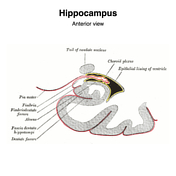
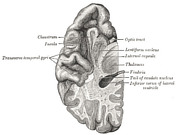
Hippocampus (Gray's illustration)
Published
27 Dec 2021
32% complete
Diagram
Case
Tela choroidea and choroid plexus of lateral ventricles (Gray's illustration)

Published
27 Dec 2021
44% complete
Diagram
Case
Internal capsule fibers (Gray's illustration)

Published
27 Dec 2021
32% complete
Diagram
Case
Fornix (Gray's illustration)

Published
27 Dec 2021
32% complete
Diagram
Case
Corpus striatum (Gray's illustration)

Published
27 Dec 2021
35% complete
Diagram
Case
Corona radiata (Gray's illustration)

Published
27 Dec 2021
32% complete
Diagram
Case
Basal ganglia (Gray's illustrations)

Published
27 Dec 2021
32% complete
Diagram
Case
Dural venous sinuses (Gray's illustrations)

Published
20 Dec 2021
32% complete
Diagram
Case
Cavernous sinus (Gray's illustration)

Published
08 Dec 2021
32% complete
Diagram
Case
Internal cerebral veins (Gray's illustration)

Published
07 Dec 2021
32% complete
Diagram
Case
Brainstem arterial territories (diagrams)

Published
07 Oct 2020
44% complete
Diagram
Case
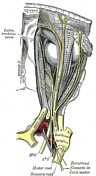
Mandibular division of the trigeminal nerve and submandibular and otic ganglia (Gray's illustration)
Published
20 Sep 2020
35% complete
Diagram
Case
Mandibular division of the trigeminal nerve (Gray's illustration)
Published
20 Sep 2020
35% complete
Diagram
Case
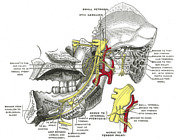
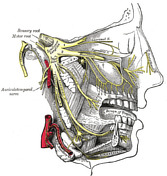
Maxillary division of the trigeminal nerve (Gray's illustration)

Published
20 Sep 2020
35% complete
Diagram
Case
Maxillary and mandibular divisions of the trigeminal nerve (Gray's illustration)
Published
20 Sep 2020
35% complete
Diagram
Case
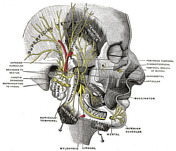
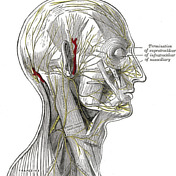
Nerves of the face, scalp and neck (Gray's illustration)
Published
20 Sep 2020
35% complete
Diagram
Case
Anatomy of the genicular ganglion (Gray's illustration)

Published
19 Sep 2020
35% complete
Diagram
Case
Nerves of the orbit (Gray's illustration)

Published
19 Sep 2020
35% complete
Diagram
Case
Anatomy of the ophthalmic division of the trigeminal nerve (Gray's illustration)
Published
19 Sep 2020
35% complete
Diagram
Case
Anatomy of the oculomotor nerve (Gray's illustration)

Published
19 Sep 2020
35% complete
Diagram
Case
Cranial nerve nuclei (axial diagrams)

Published
18 Sep 2020
25% complete
Diagram
Case
Pontine anatomy - CN V (diagram)

Published
18 Sep 2020
32% complete
Diagram
Case
Olfactory nerve (Gray's illustration)

Published
17 Sep 2020
35% complete
Diagram
Case
Optic nerve and chiasm (Gray's illustration)

Published
17 Sep 2020
35% complete
Diagram
Case
Cranial meninges and falx (Gray's illustration)

Published
14 Sep 2020
35% complete
Diagram
Case
Spinal meninges (Gray's illustration)
Published
14 Sep 2020
35% complete
Diagram
Case
Tentorium cerebelli (Gray's illustration)
Published
14 Sep 2020
32% complete
Diagram
Case
Insular cortex (Gray's illustration)

Published
14 Sep 2020
32% complete
Diagram
Case
Basal ganglia (Gray's illustration)
Published
14 Sep 2020
35% complete
Diagram
Case
Brainstem cross-sectional anatomy (diagrams)

Published
08 Sep 2020
29% complete
Diagram
Case
Optic radiations (Gray's illustration)

Published
08 Sep 2020
35% complete
Diagram
Case
Descending spinal tracts (Gray's illustration)

Published
08 Sep 2020
35% complete
Diagram
Case
Ascending spinal tracts (Gray's illustration)

Published
08 Sep 2020
35% complete
Diagram
Case
Cranial nerves (Gray's illustration)

Published
08 Sep 2020
32% complete
Diagram
Case
Spinal cord (Gray's illustration)

Published
07 Sep 2020
35% complete
Diagram
Case
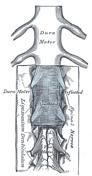
Cauda equina (Gray's illustration)

Published
07 Sep 2020
35% complete
Diagram
Case
Circle of Willis (Gray's illustration)

Published
06 Sep 2020
32% complete
Diagram
Case
Spinal cord cross section (Gray's illustration)

Published
06 Sep 2020
35% complete
Diagram
Case
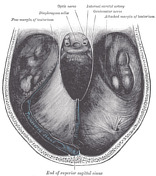
Cranial nerves in the posterior fossa (Gray's illustration)

Published
06 Sep 2020
35% complete
Diagram
Case
Brainstem tracts (Gray's illustrations)

Published
06 Sep 2020
32% complete
Diagram
Case
Pyramids and olives (Gray's illustration)
Published
03 Sep 2020
35% complete
Diagram
Case
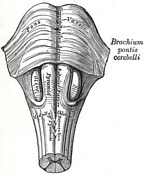
Cerebellar peduncles (Gray's illustration)

Published
03 Sep 2020
35% complete
Diagram
Case
Colliculi connections (Gray's illustration)

Published
03 Sep 2020
35% complete
Diagram
Case
Interconnection of cranial nerve nuclei (Gray's illustration)

Published
03 Sep 2020
35% complete
Diagram
Case
Cerebellum inferior surface (Gray's illustration)

Published
03 Sep 2020
35% complete
Diagram
Case
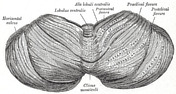
Cerebellum superior surface (Gray's illustration)
Published
03 Sep 2020
32% complete
Diagram
Case
Cerebellar peduncles (Gray's illustration)

Published
03 Sep 2020
35% complete
Diagram
Case
Dentate nucleus (Gray's illustration)

Published
03 Sep 2020
32% complete
Diagram
Case
Anatomy of the lateral ventricles (Gray's illustration)

Published
03 Sep 2020
32% complete
Diagram
Case
Upper-level pons (Gray's illustration)

Published
03 Sep 2020
32% complete
Diagram
Case
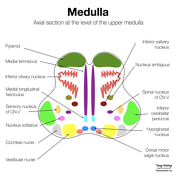
Mid-level medulla anatomy (Gray's illustration)

Published
03 Sep 2020
32% complete
Diagram
Case
Decussation of fibers in the brainstem (Gray's illustration)

Published
03 Sep 2020
35% complete
Diagram
Case
Upper medulla anatomy - CN X (diagram)
Published
02 Sep 2020
22% complete
Diagram
Case
Upper medulla anatomy - CN IX (diagram)

Published
01 Sep 2020
32% complete
Diagram
Case
Upper medulla anatomy - CN VIII (diagram)

Published
01 Sep 2020
32% complete
Diagram
Case
Lower pons anatomy - CN VII (diagram)

Published
18 Aug 2020
22% complete
Diagram
Case
Lower pons anatomy - CN VI (diagram)

Published
18 Aug 2020
22% complete
Diagram
Case
Upper medulla anatomy - CN XII (diagram)

Published
17 Aug 2020
32% complete
Diagram
Case
Upper medulla anatomy - CN XI (diagram)

Published
17 Aug 2020
32% complete
Diagram
Case
Venous vascular territories of the lateral cerebral cortex (illustration)

Published
20 Jul 2020
44% complete
Diagram
Case
Venous vascular territories of the medial cerebral cortex (illustration)

Published
20 Jul 2020
44% complete
Diagram
Case
Brain venous vascular territories (diagram)

Published
16 Jul 2020
44% complete
Diagram
Case
Brain perfusion - time attenuation curves

Published
13 Aug 2019
29% complete
Diagram
Case
Anatomical relations (creative commons illustration)

Published
20 Mar 2018
32% complete
Diagram
Case
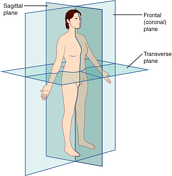
Anatomical planes (creative commons illustration)
Published
20 Mar 2018
32% complete
Diagram
Case
Orbital apex (diagram)

Published
04 Apr 2017
38% complete
Diagram
ADVERTISEMENT: Supporters see fewer/no ads