


1,433 results found
Case
Shoulder bursa (Gray's illustration)

Published
24 Nov 2020
35% complete
Diagram
Case
Sternoclavicular joint (Gray's illustration)

Published
24 Nov 2020
32% complete
Diagram
Case
Inguinal and lacunar ligaments (Gray's illustration)

Published
24 Nov 2020
35% complete
Diagram
Case
Pelvic ligaments (Gray's illustrations)

Published
24 Nov 2020
35% complete
Diagram
Case
CT angiogram head axial - labeling questions

Published
24 Nov 2020
40% complete
CT
Annotated image
Case
Normal tongue base MRI

Published
09 Nov 2020
53% complete
MRI
Case
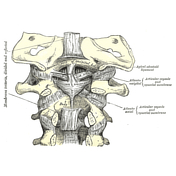
Tectorial membrane and C0-1-2 ligaments (Gray's illustration)
Published
29 Oct 2020
35% complete
Diagram
Case
Atlanto-odontoid joint (Gray's illustration)

Published
29 Oct 2020
32% complete
Diagram
Case
Posterior atlanto-occipital membrane (Gray's illustration)

Published
29 Oct 2020
32% complete
Diagram
Case
Anterior atlanto-occipital membrane (Gray's illustration)

Published
29 Oct 2020
32% complete
Diagram
Case
Ligamentum flavum (Gray's illustration)

Published
28 Oct 2020
32% complete
Diagram
Case
Posterior longitudinal ligament (Gray's illustration)

Published
28 Oct 2020
32% complete
Diagram
Case
Ligaments of the lumbar spine (Gray's illustration)

Published
28 Oct 2020
35% complete
Diagram
Case
Pars interarticularis

Published
28 Oct 2020
29% complete
Annotated image
Case
Normal MRI pelvis (rectal cancer protocol)

Published
28 Oct 2020
83% complete
MRI
Case
Coronary arteries (creative commons illustration)

Published
27 Oct 2020
32% complete
Diagram
Case
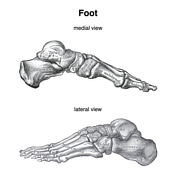
Bones of the foot (Gray's illustration)
Published
21 Oct 2020
35% complete
Diagram
Case
Foot - ossification centers (Gray's illustrations)

Published
20 Oct 2020
32% complete
Diagram
Case
Hangman fracture (Levine and Edwards grade 2) and vertebral artery traumatic pseudoaneurysm (Biffl grade 3)

Published
20 Oct 2020
92% complete
CT
Case
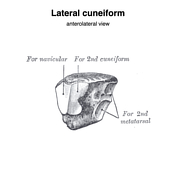
Lateral cuneiform (Gray's illustration)
Published
20 Oct 2020
35% complete
Diagram
Case
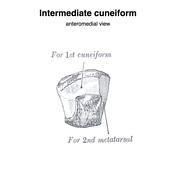
Intermediate cuneiform (Gray's illustration)
Published
20 Oct 2020
35% complete
Diagram
Case
Medial cuneiform (Gray's illustration)

Published
20 Oct 2020
35% complete
Diagram
Case
Navicular (Gray's illustration)

Published
20 Oct 2020
35% complete
Diagram
Case
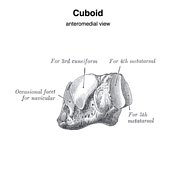
Cuboid (Gray's illustration)
Published
20 Oct 2020
35% complete
Diagram
Case
Talus (Gray's illustration)

Published
20 Oct 2020
35% complete
Diagram
Case
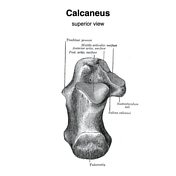
Calcaneus (Gray's illustration)
Published
20 Oct 2020
35% complete
Diagram
Case
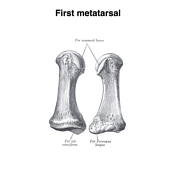
Metatarsals (Gray's illustration)
Published
20 Oct 2020
32% complete
Diagram
Case
Foot bones - muscle attachments (Gray's illustration)

Published
20 Oct 2020
35% complete
Diagram
Case
Distal fibula (Gray's illustration)

Published
20 Oct 2020
32% complete
Diagram
Case
Fibula - ossification centers (Gray's illustration)

Published
20 Oct 2020
35% complete
Diagram
Case
Proximal tibia (Gray's illustration)

Published
20 Oct 2020
35% complete
Diagram
Case
Tibia - ossification centers (Gray's illustration)

Published
20 Oct 2020
35% complete
Diagram
Case
Tibia and fibula - muscle attachments (Gray's illustration)

Published
20 Oct 2020
35% complete
Diagram
Case
Pelvis - ossification centers (Gray's illustration)

Published
20 Oct 2020
35% complete
Diagram
Case
Proximal femur (Gray's illustration)

Published
20 Oct 2020
32% complete
Diagram
Case
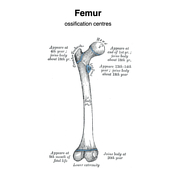
Femur - ossification centers (Gray's illustration)
Published
20 Oct 2020
35% complete
Diagram
Case
Distal femur (Gray's illustration)

Published
20 Oct 2020
32% complete
Diagram
Case
Femur - muscle attachments (Gray's illustration)

Published
20 Oct 2020
32% complete
Diagram
Case
Patella (Gray's illustration)

Published
20 Oct 2020
32% complete
Diagram
Case
Pelvis - muscle attachments (Gray's illustration)

Published
19 Oct 2020
35% complete
Diagram
Case
Hand - ossification centers (Gray's illustrations)

Published
19 Oct 2020
35% complete
Diagram
Case
Metacarpals (Gray's illustration)

Published
19 Oct 2020
32% complete
Diagram
Case
Triquetrum (Gray's illustration)

Published
19 Oct 2020
35% complete
Diagram
Case
Trapezium (Gray's illustration)

Published
19 Oct 2020
35% complete
Diagram
Case
Trapezioid (Gray's illustration)

Published
19 Oct 2020
35% complete
Diagram
Case
Scaphoid (Gray's illustration)

Published
19 Oct 2020
35% complete
Diagram
Case
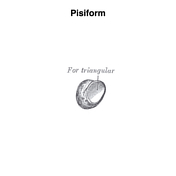
Pisiform (Gray's illustration)
Published
19 Oct 2020
35% complete
Diagram
Case
Lunate (Gray's illustration)

Published
19 Oct 2020
35% complete
Diagram
Case
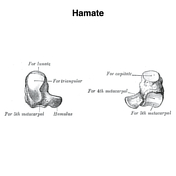
Hamate (Gray's illustration)
Published
19 Oct 2020
35% complete
Diagram
Case
Capitate (Gray's illustration)

Published
19 Oct 2020
35% complete
Diagram
Case
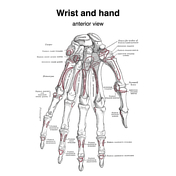
Wrist and hand bones - muscle attachments (Gray's illustration)
Published
16 Oct 2020
35% complete
Diagram
Case
Radius and ulna - muscle attachments (Gray's illustration)

Published
16 Oct 2020
35% complete
Diagram
Case
Ulna - ossification centers (Gray's illustration)

Published
16 Oct 2020
32% complete
Diagram
Case
Radius - ossification centers (Gray's illustration)

Published
16 Oct 2020
32% complete
Diagram
Case
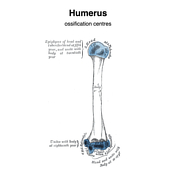
Humerus - ossification centers (Gray's illustrations)
Published
15 Oct 2020
32% complete
Diagram
Case
Scapula - ossification centers (Gray's illustrations)

Published
15 Oct 2020
32% complete
Diagram
Case
Scapula - lateral view (Gray's illustration)

Published
15 Oct 2020
32% complete
Diagram
Case
Humerus - muscle attachments (Gray's illustration)

Published
15 Oct 2020
32% complete
Diagram
Case
Mandibular and dental fracture

Published
13 Oct 2020
85% complete
X-ray
Case
External laryngocoele and pharyngocoele

Published
13 Oct 2020
74% complete
CT
Case
Scapula - muscle attachments (Gray's illustration)

Published
13 Oct 2020
32% complete
Diagram
Case
Mandible - muscle attachments (Gray's illustration)

Published
13 Oct 2020
32% complete
Diagram
Case
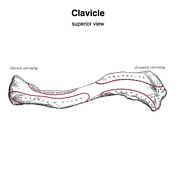
Clavicle - muscle attachments (Gray's illustration)
Published
12 Oct 2020
32% complete
Diagram
Case
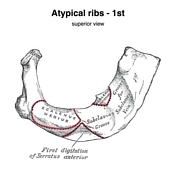
Atypical ribs - 1st and 2nd (Gray's illustration)
Published
12 Oct 2020
35% complete
Diagram
Case
Atypical ribs - 10, 11, 12 (Gray's illustration)

Published
12 Oct 2020
35% complete
Diagram
Case
Typical ribs (Gray's illustration)

Published
12 Oct 2020
35% complete
Diagram
Case
Sternum and costal cartilages - muscle attachments (Gray's illustration)

Published
12 Oct 2020
35% complete
Diagram
Case
Sternum (Gray's illustration)

Published
12 Oct 2020
35% complete
Diagram
Case
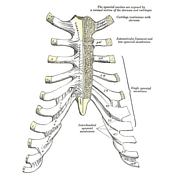
Thoracic cage (Gray's illustrations)

Published
11 Oct 2020
35% complete
Diagram
Case
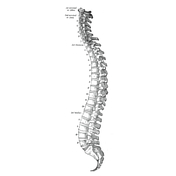
Lateral spine anatomy (Gray's illustration)
Published
11 Oct 2020
35% complete
Diagram
Case
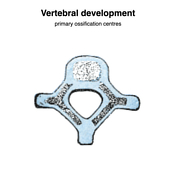
Vertebral ossification centers
Published
09 Oct 2020
35% complete
Diagram
Case
Sacrum (Gray's illustration)

Published
09 Oct 2020
32% complete
Diagram
Case
Coccyx (Gray's illustration)

Published
09 Oct 2020
32% complete
Diagram
Case
Atypical thoracic vertebrae (Gray's illustration)

Published
08 Oct 2020
35% complete
Diagram
Case
Vertebra prominens (Gray's illustration)

Published
08 Oct 2020
35% complete
Diagram
Case
Atlas (Gray's illustration)

Published
08 Oct 2020
35% complete
Diagram
Case
Axis (Gray's illustration)

Published
08 Oct 2020
35% complete
Diagram
Case
Brainstem arterial territories (diagrams)

Published
07 Oct 2020
44% complete
Diagram
Case
Mandible at different ages (Gray's illustrations)

Published
07 Oct 2020
35% complete
Diagram
Case
Costotransverse joints (Gray's illustration)

Published
07 Oct 2020
35% complete
Diagram
Case
Costovertebral joints (Gray's illustration)

Published
07 Oct 2020
35% complete
Diagram
Case
Costochondral joints (Gray's illustration)
Published
07 Oct 2020
35% complete
Diagram
Case
Typical cervical vertebra (Gray's illustration)

Published
05 Oct 2020
35% complete
Diagram
Case
Typical lumbar vertebra (Gray's illustration)

Published
05 Oct 2020
35% complete
Diagram
Case
Esophageal temperature probe in lung

Published
05 Oct 2020
82% complete
X-ray
Case
Food bolus (lateral neck x-ray)

Published
05 Oct 2020
91% complete
X-ray
Case
Temporomandibular joint anatomy (internal) (Gray's anatomy)

Published
05 Oct 2020
32% complete
Diagram
Case
Temporomandibular joint anatomy (medial) (Gray's anatomy)

Published
05 Oct 2020
35% complete
Diagram
Case
Temporomandibular joint anatomy (lateral) (Gray's anatomy)

Published
05 Oct 2020
32% complete
Diagram
Case
Typical thoracic vertebra (Gray's illustration)

Published
05 Oct 2020
35% complete
Diagram
Case
Trigeminal nerve cutaneous distribution (Gray's anatomy)

Published
24 Sep 2020
32% complete
Diagram
Case
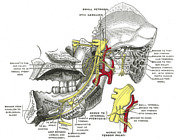
Mandibular division of the trigeminal nerve and submandibular and otic ganglia (Gray's illustration)
Published
20 Sep 2020
35% complete
Diagram
Case
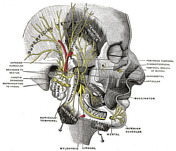
Mandibular division of the trigeminal nerve (Gray's illustration)
Published
20 Sep 2020
35% complete
Diagram
Case
Elbow joint capsule (Gray's illustration)

Published
20 Sep 2020
32% complete
Diagram
ADVERTISEMENT: Supporters see fewer/no ads


 Unable to process the form. Check for errors and try again.